Linux创建虚拟WLAN接口并测试
Linux创建虚拟WLAN接口并测试
创建虚拟WLAN接口主要通过 mac80211_hwsim内核模块实现,该模块可以模拟多个无线网卡设备,并支持创建虚拟的WLAN接口。
mac80211_hwsim简介
mac80211_hwsim is a Linux kernel module that can be used to simulate
arbitrary number of IEEE 802.11 radios for mac80211. It can be used to
test most of the mac80211 functionality and user space tools (e.g.,
hostapd and wpa_supplicant) in a way that matches very closely with
the normal case of using real WLAN hardware. From the mac80211 view
point, mac80211_hwsim is yet another hardware driver, i.e., no changes
to mac80211 are needed to use this testing tool.The main goal for mac80211_hwsim is to make it easier for developers
to test their code and work with new features to mac80211, hostapd,
and wpa_supplicant. The simulated radios do not have the limitations
of real hardware, so it is easy to generate an arbitrary test setup
and always reproduce the same setup for future tests. In addition,
since all radio operation is simulated, any channel can be used in
tests regardless of regulatory rules.
mac80211_hwsim是一个Linux内核模块,可用于模拟任意数量的IEEE 802.11无线电设备供mac80211使用。它可以用来测试大多数mac80211功能以及用户空间工具(例如,hostapd和wpa_supplicant),其方式与使用真实WLAN硬件的正常情况非常接近。mac80211_hwsim的主要目标是让开发者更容易测试他们的代码,以及与mac80211、hostapd和wpa_supplicant的新功能进行工作。模拟的无线电设备不受真实硬件的限制,因此可以轻松生成任意的测试设置,并在未来的测试中始终复现相同的设置。此外,由于所有的无线电操作都是模拟的,所以在测试中可以使用任何频道,不受监管规则的限制。
内核相关文档:Documentation/networking/mac80211_hwsim/mac80211_hwsim.rst
内核相关代码:drivers/net/wireless/mac80211_hwsim.c
接下来,我们来看看如何使用 mac80211_hwsim来创建虚拟WLAN接口,并进行相关的测试,主要分为以下几步:
- 设置两个虚拟WLAN接口(
wlan0和wlan1) - 将
wlan0和wlan1隔离到两个网络命名空间中(AP和Client) - 使用
hostapd和dnsmasq创建一个虚拟接入点 - 连接WiFi客户端到网络
- 运行基本的网络ping测试
准备工作
- 安装必要的工具和软件包:
sudo apt install hostapd dnsmasq wpa_supplicant iw- 准备编译好的
mac80211_hwsim驱动模块
创建虚拟WLAN接口
- 加载
mac80211_hwsim驱动
sudo modprobe mac80211_hwsim radios=2radios=2表示创建两个虚拟无线网卡,不加该参数默认也是2个。
- 查看新创建的虚拟网卡
sudo ip link5: wlan0: <BROADCAST,MULTICAST> mtu 1500 qdisc noop state DOWN mode DEFAULT group default qlen 1000
link/ether 02:00:00:00:00:00 brd ff:ff:ff:ff:ff:ff
6: wlan1: <BROADCAST,MULTICAST> mtu 1500 qdisc noop state DOWN mode DEFAULT group default qlen 1000
link/ether 02:00:00:00:01:00 brd ff:ff:ff:ff:ff:ff
7: hwsim0: <BROADCAST,MULTICAST> mtu 1500 qdisc noop state DOWN mode DEFAULT group default qlen 1000
link/ieee802.11/radiotap 12:00:00:00:00:00 brd ff:ff:ff:ff:ff:ff这里还有个新增的接口:hwsim0,主要是用于调试使用,通过它可以监听所有通道的无线帧,这里不做过多介绍。
将接口隔离到命名空间中
在创建好接口之后,所有接口在系统中都是可见且可访问的,我们现在需要将这两个WiFi接口分开,一个当做AP(WLAN0),一个当做Client(WLAN1),以便能够测试它们之间的连通性。
幸运的是,网络命名空间隔离允许我们将接口彼此分开。更具体地说,它允许我们运行一个单独的shell,其中一个WLAN接口将位于其中,不同网络命名空间中的接口彼此不可见。在这种配置下,数据包需要通过虚拟WiFi才能到达彼此。
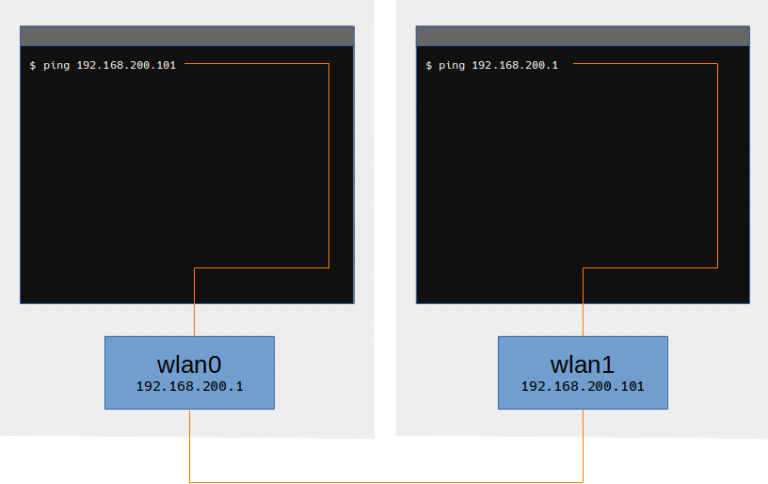
假设WLAN0的IP地址是192.168.200.1,而WLAN1的IP地址是192.168.200.101,隔离后的情况如下:

我们将为WLAN0接口创建一个名为 wifi_master的网络命名空间,并在该命名空间中运行一个单独的shell。
这样我们就有了两个shell:一个用于WiFi热点(wifi_master),另一个用于WiFi客户端。这两个shell只能看到它们对应的WLAN接口,而不知道另一个接口的存在。
首先创建网络命名空间:
# 新增网络命名空间
ip netns add wifi_master
# 查看网络命名空间
ip netns list
分配网络命名空间
分配网络命名空间最方便的方式之一是通过使用 ip link set 命令。不幸的是,这种方法不适用于虚拟接口,因此我们需要使用 iw 工具来处理。
使用 iw 实用工具分配WLAN接口是基于进程ID的。所以首先我们将在新的网络命名空间中启动我们的WiFi热点shell(另开一个终端执行,并一直开着):
# Run this in a separate shell.
ip netns exec wifi_master bash
echo $BASHPID
336930
这将是我们称为wifi_master的WiFi热点,其进程ID为336930。
现在,从我们的第一个shell中,WLAN0仍然可见,我们将要把WLAN0分配给wifi_master命名空间:
# 后面的PID:336930与上面获取的wifi_master shell的PID保持一致
# phy0需要对应wlan0的wiphy,可使用 iw wlan0 info 获取
iw phy phy0 set netns 336930
结果应该是这两个shell:WiFi热点带有WLAN0接口,以及WiFi客户端带有WLAN1接口。
每个shell里可以使用ip link去确认是否成功分配了接口。
配置接入点(WLAN0)
现在我们在WiFi热点shell中配置接入点,接口配置一个静态IP,dnsmasq将作为DHCP服务器运行,而hostapd用于WiFi设置。
- 首先,我们设置静态IP:
ip addr add 192.168.200.1/24 dev wlan0- 接下来后台运行
dnsmasq作为DHCP服务器:
dnsmasq -i wlan0 --dhcp-range=192.168.200.128,192.168.200.200 &如果运行出现如下错误:
dnsmasq: failed to create listening socket for 127.0.0.1: 无法指定被请求的地址则需要up下lo:
#或 ifconfig lo up
ip link set lo up- 最后,我们使用
hostapd设置WiFi接入点:
hostapd hostapd.conf使用最简单的配置文件 hostapd.conf:
# hostapd.conf
interface=wlan0
driver=nl80211
country_code=DE
ssid=Virtual Wifi
channel=0
hw_mode=b
wpa=3
wpa_key_mgmt=WPA-PSK
wpa_pairwise=TKIP CCMP
wpa_passphrase=TopSecretWifiPassphrase
auth_algs=3
beacon_int=100
打印如下类似的信息表示接入点已成功启动并运行,下一步是配置WiFi客户端。
Configuration file: hostapd.conf
nl80211: kernel reports: expected nested data
wlan0: interface state UNINITIALIZED->COUNTRY_UPDATE
ACS: Automatic channel selection started, this may take a bit
wlan0: interface state COUNTRY_UPDATE->ACS
wlan0: ACS-STARTED
wlan0: ACS-COMPLETED freq=2437 channel=6
Using interface wlan0 with hwaddr 02:00:00:00:00:00 and ssid "Virtual Wifi"
wlan0: interface state ACS->ENABLED
wlan0: AP-ENABLED
连接WiFi客户端(WLAN1)到网络AP
连接WiFi客户端到网络
我们使用 wpa_supplicant连接到WiFi接入点。在WiFi客户端shell中,我们首先创建以下非常简单的wpa_supplicant.conf文件:
# wpa_supplicant.conf
network={
  ssid="Virtual Wifi"
  key_mgmt=WPA-PSK
  psk="TopSecretWifiPassphrase"
}
通过如下命令连接到WiFi接入点(AP):
wpa_supplicant -B -i wlan1 -c wpa_supplicant.conf在WiFi master终端可以看到如下的认证过程:
......
wlan0: STA 02:00:00:00:01:00 IEEE 802.11: authenticated
wlan0: STA 02:00:00:00:01:00 IEEE 802.11: associated (aid 1)
wlan0: AP-STA-CONNECTED 02:00:00:00:01:00
wlan0: STA 02:00:00:00:01:00 RADIUS: starting accounting session 01EB9D41E061C82E
wlan0: STA 02:00:00:00:01:00 WPA: pairwise key handshake completed (RSN)
握手完成表示WiFi客户端已成功连接到WiFi接入点。
自动获取IP地址
WPA握手完成后,我们使用 dhclient来自动获取IP地址。
dhclient wlan1查看是否已成功获取IP地址:
ip addr show wlan1测试连接
最后,我们使用 ping命令测试连接:
#在WiFi客户端shell中,ping AP的地址
ping 192.168.200.1
正常情况下,我们是可以相互ping通的。
总结
通过上述步骤,我们走完了虚拟WIFI测试的整个流程。我们创建了一个虚拟WiFi接口,并配置了一个WiFi接入点。然后,使用WiFi客户端连接到该接入点,并自动获取IP地址。最后,我们测试了连接,确保WiFi客户端可以与WiFi接入点相互交互。


